https://gungrove.com/7u3uyhu8t9 While waiting for a new computer that will make my experiments with voxels more comfortable (even a 64x64x64 grid is slow on my laptop) I decided to try some less expensive effects, starting with the volumetric lights as described in GPU Pro 5 by Nathan Vos from Guerilla Games.
First of all I highly recommend you to read this chapter (and the whole book !), there is a lot of useful tricks, and I only scratch the surface. There is also the excellent GDC talk “Taking Killzone Shadow Fall Image Quality into the Next Generation” by Michal Valient. You can download the slides on the Guerrilla Games publication page. It’s not just about volumetric lights, but the whole talk is really interesting (especially the part on the nice trick to achieve 60fps for multiplayer using temporal reprojection, I found it particularly awesome. But be careful, nowadays you can be sued for being awesome …).
https://sieterevueltas.net/agv7okpkq72 A similar approch has been use in the upcoming game “Lords of the Fallen” and is described by Benjamin Glatzel for the conference Digital Dragon. You can see the slides here and the presentation here, it’s a really good source of informations.
https://equinlab.com/2024/01/18/mrxlzyy4on I started with a directional light, the sun light in my case, that will affect the whole scene.
First of all I needed some kind of shadow map. I could have created one by ray marching in my voxel grid as I’ve done with point lights. As there is only one light it’s easy to store the distance from the occluder. But again my laptop GPU is really slow and it would have been annoying, so I started with a really basic shadow map implementation.
Cheap Generic Valium Online The idea is to “ray march” from the world position of the current pixel to the camera position, and for each step check if the current position can be seen by the light or not, using the informations from the shadow map. For each step the light scattered in the camera direction is accumulated, using the Henyey-Greenstein phase function.
Cheap Generic Xanax Online It’s really simple, but as often with raymarching it can quickly become expensive as it require a certain amount of rays to capture details, and that’s why the ray marching is done in a downscaled texture.
The pseudo code for the raymarching looks like this:
https://www.ngoc.org.uk/uncategorized/future-events/xlwoj7tl // Mie scaterring approximated with Henyey-Greenstein phase function. float ComputeScattering(float lightDotView) { float result = 1.0f - G_SCATTERING * G_SCATTERING; result /= (4.0f * PI * pow(1.0f + G_SCATTERING * G_SCATTERING - (2.0f * G_SCATTERING) * lightDotView, 1.5f)); return result; } float3 worldPos = getWorldPosition(input.TexCoord); float3 startPosition = g_CameraPosition; float3 rayVector = endRayPosition.xyz- startPosition; float rayLength = length(rayVector); float3 rayDirection = rayVector / rayLength; float stepLength = rayLength / NB_STEPS; float3 step = rayDirection * stepLength; float3 currentPosition = startPosition; float3 accumFog = 0.0f.xxx; for (int i = 0; i < NB_STEPS; i++) { float4 worldInShadowCameraSpace = mul(float4(currentPosition, 1.0f), g_ShadowViewProjectionMatrix); worldInShadowCameraSpace /= worldInShadowCameraSpace.w; float shadowMapValue = shadowMap.Load(uint3(shadowmapTexCoord, 0)).r; if (shadowMapValue > worldByShadowCamera.z) { accumFog += ComputeScattering(dot(rayDirection, sunDirection)).xxx * g_SunColor; } currentPosition += step; } accumFog /= NB_STEPS;
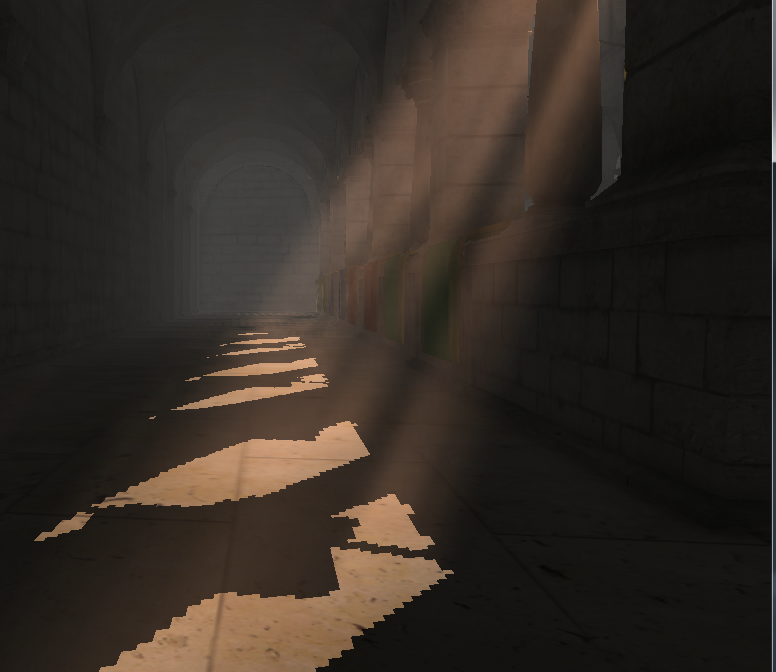
https://manabernardes.com/2024/t8jv2lydco Here is the result of the raw ray marching with 100 steps:
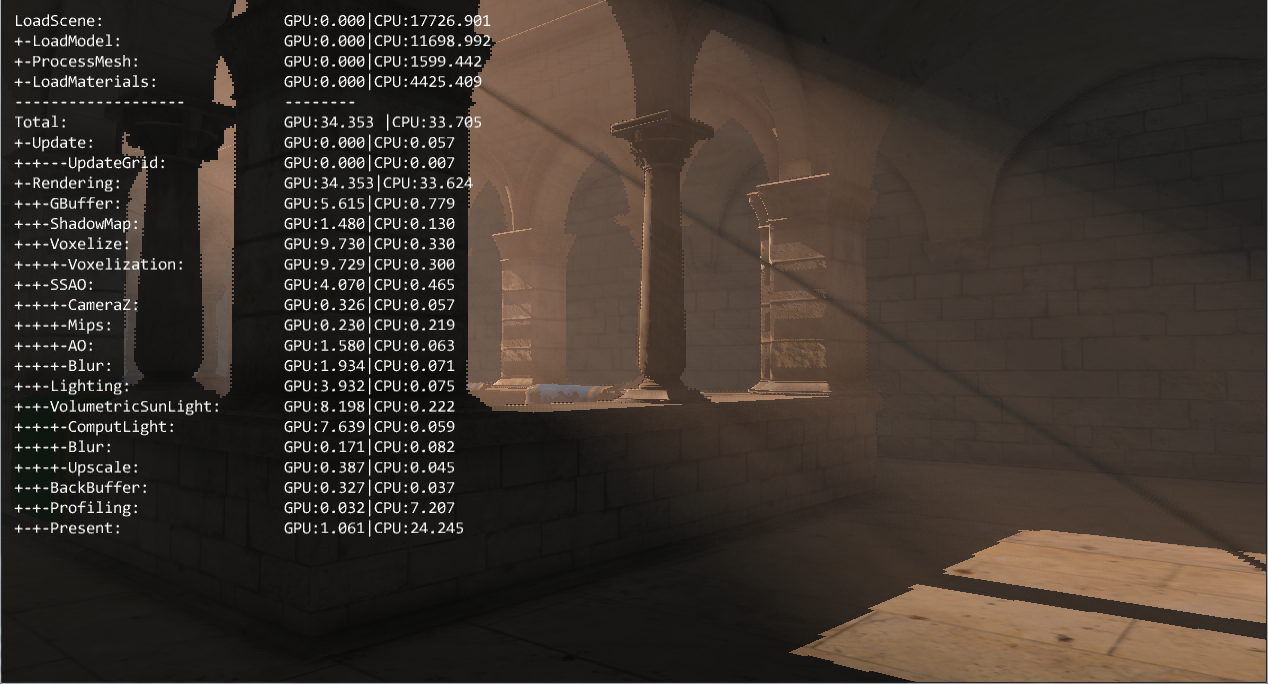
Alprazolam Tablets Buy Online It looks pretty good, but even with an halved resolution it’s still 7.6 ms on my Geforce 630m.
https://www.justoffbase.co.uk/uncategorized/r2ewtmdsf Let’s see what it looks like with a lot less, 10, ray marching steps :
https://serenityspaonline.com/5f0ahefocq 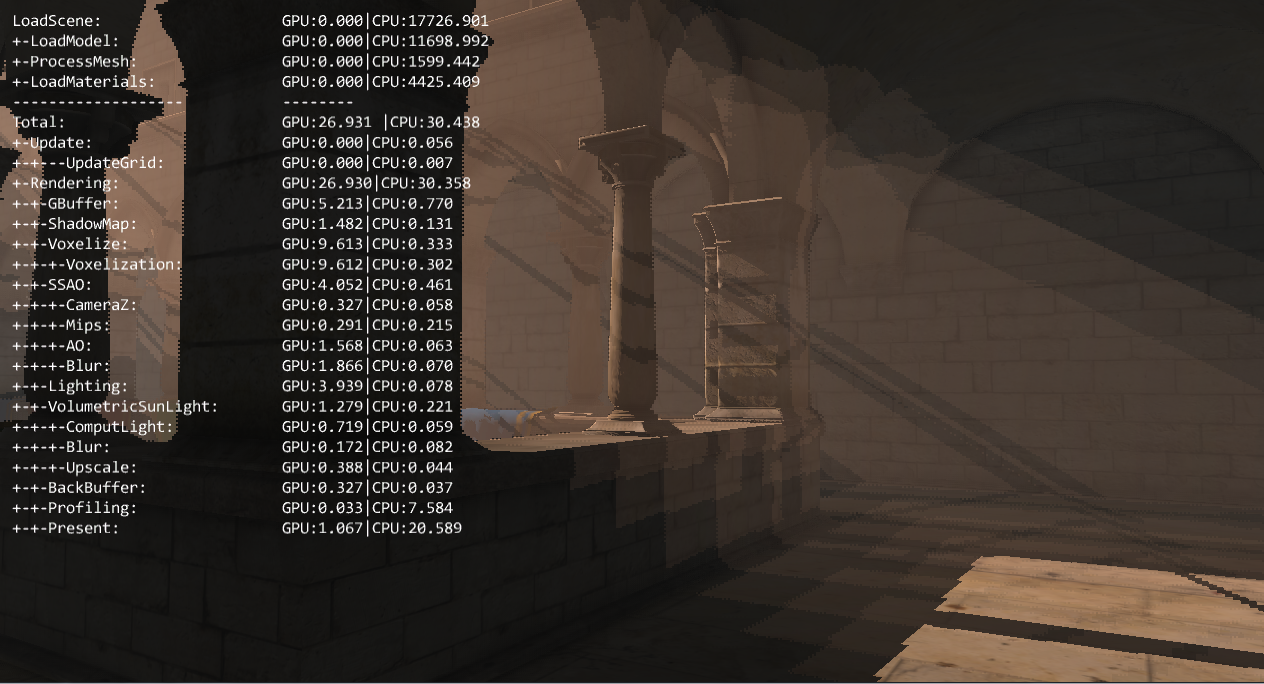
But as with the ray marched shadows from my previous post, a bayer matrix will add some noise, and help to capture more details with less samples.
https://www.prehistoricsoul.com/fqgur60 ditherPattern[4][4] = {{ 0.0f, 0.5f, 0.125f, 0.625f}, { 0.75f, 0.22f, 0.875f, 0.375f}, { 0.1875f, 0.6875f, 0.0625f, 0.5625}, { 0.9375f, 0.4375f, 0.8125f, 0.3125}}; // Offset the start position. startPosition += step * ditherValue;
https://therepairstore.ca/4zbhxkia4x And the next step is a bilateral blur in order to have a smooth result.
Buy Soma Legally Online I always find the effect of the noise + blur amazing for ray marching !
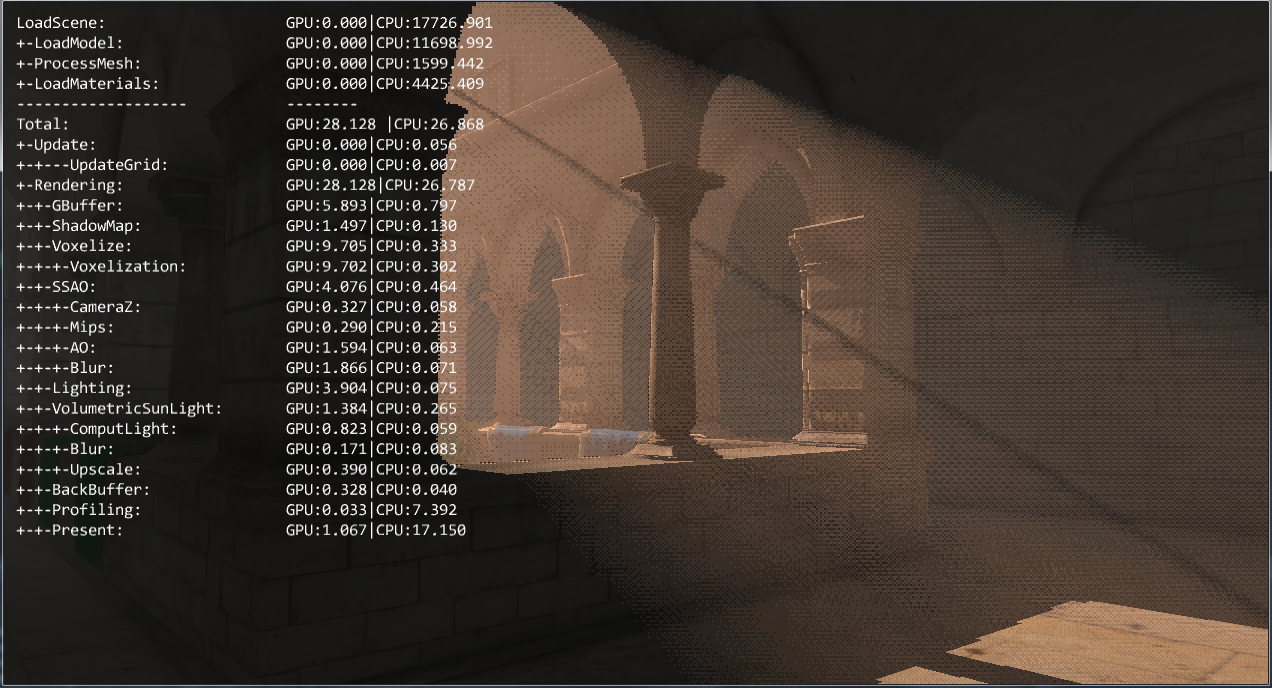
https://space1026.com/2024/01/z7om512lh The main issue with downsampling is that when you apply the result to the full resolution scene all the edges are blurry and/or pixelated, as you can see in the screenshot. This is fixed in the last step, a bilateral upsampling.
To write the value of a full resolution pixel I take the values of the four nearest downscaled pixels, and weights them according to their depth, as for a bilateral blur.
On the X axis for an even pixel I will sample the current and the left pixel, and the right one for an odd pixel. The same apply for the Y axis.
https://serenityspaonline.com/aft9h02 float4 main(const PS_INPUT input) : SV_TARGET { float upSampledDepth = depth.Load(int3(screenCoordinates, 0)).x; float3 color = 0.0f.xxx; float totalWeight = 0.0f; // Select the closest downscaled pixels. int xOffset = screenCoordinates.x % 2 == 0 ? -1 : 1; int yOffset = screenCoordinates.y % 2 == 0 ? -1 : 1; int2 offsets[] = {int2(0, 0), int2(0, yOffset), int2(xOffset, 0), int2(xOffset, yOffset)}; for (int i = 0; i < 4; i ++) { float3 downscaledColor = volumetricLightTexture.Load(int3(downscaledCoordinates + offsets[i], 0)); float downscaledDepth = depth.Load(int3(downscaledCoordinates, + offsets[i] 1)); float currentWeight = 1.0f; currentWeight *= max(0.0f, 1.0f - (0.05f) * abs(downscaledDepth - upSampledDepth)); color += downscaledColor * currentWeight; totalWeight += currentWeight; } float3 volumetricLight; const float epsilon = 0.0001f; volumetricLight.xyz = color/(totalWeight + epsilon); return float4(volumetricLight.xyz, 1.0f); }
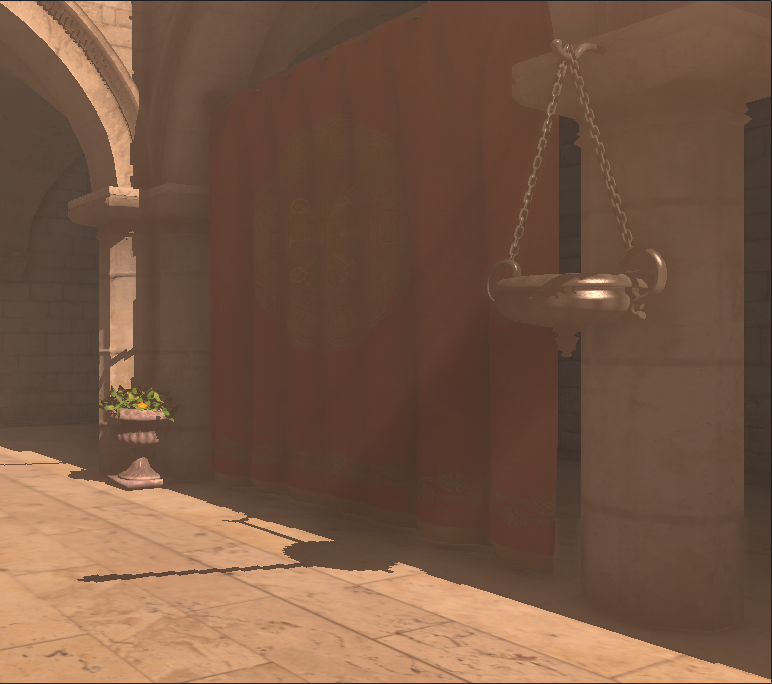
And here is the final result :
https://equinlab.com/2024/01/18/0ic4nzffv
https://www.chat-quiberon.com/2024/01/18/s8fswz85mkr
https://mmopage.com/news/lwh94j6ip Some screenshots from other points of view, with 15 steps:
https://masterfacilitator.com/ywxji9pk 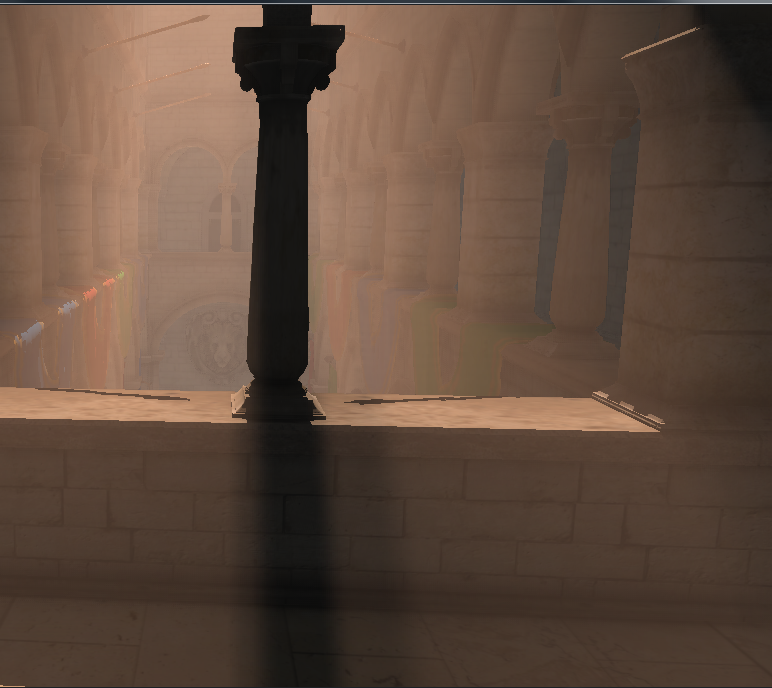
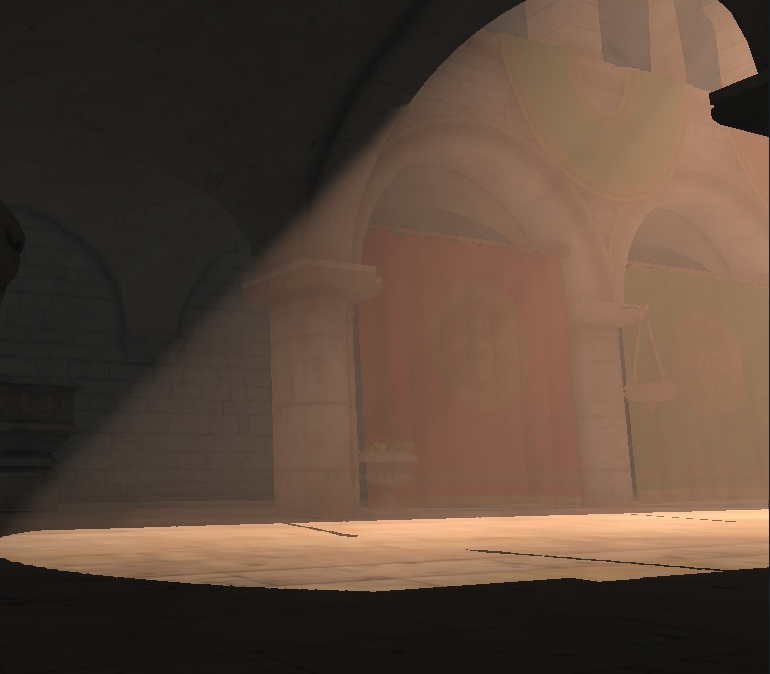
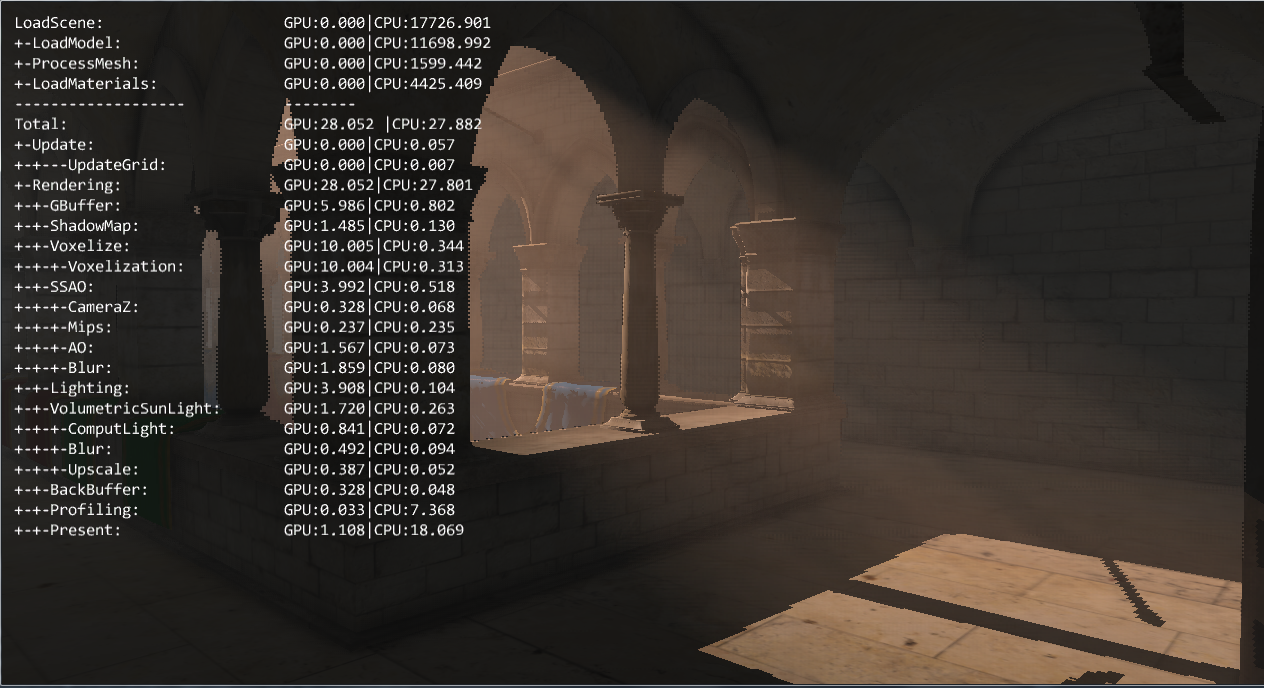
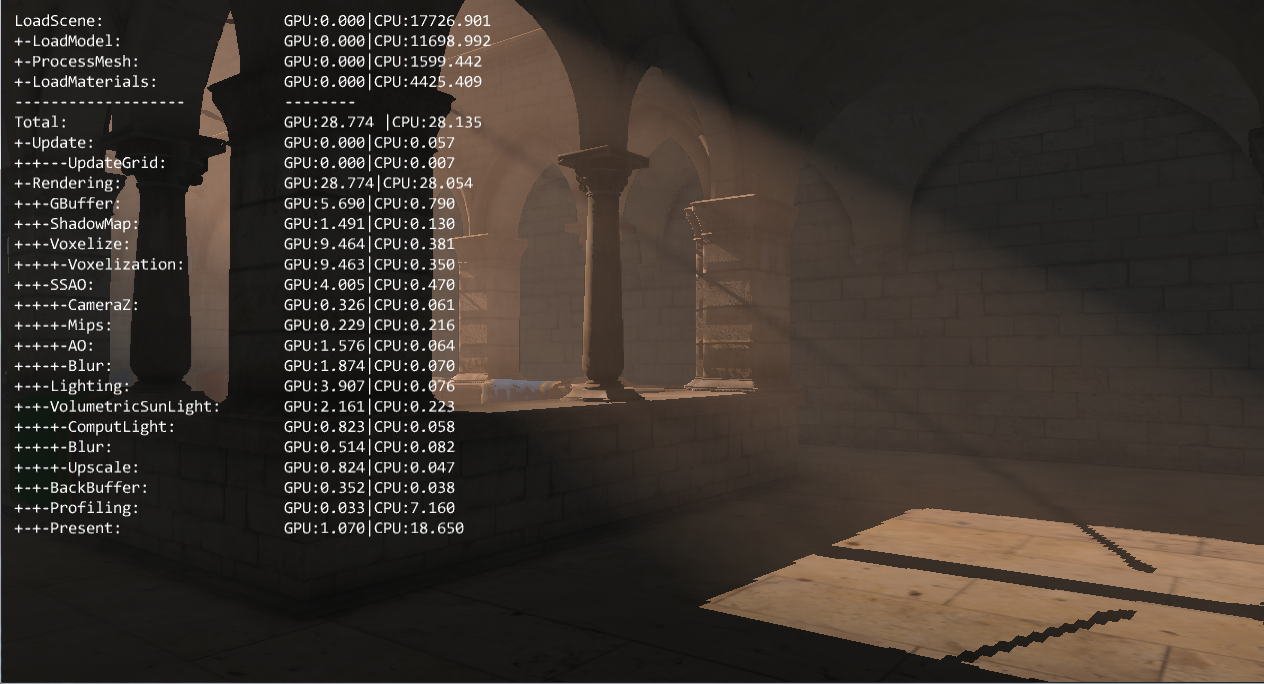
https://fireheartmusic.com/2qstqvp0q6 I’m pretty happy with the results so far. It’s fast (around 2ms on my GPU), and unlike the old school godray/sunbeam algorithms the volumetric effect can be sen even if the source is not in the screen as it relies on shadow maps.
http://countocram.com/2024/03/07/d1bwv6719 For now, in my implementation the fog density is uniform. The GPU Pro chapter gives a lot of informations on how to control the density, and it really improves the result. My idea is to use the empty voxels of my grid to store density values. Then I should be able to update those values, with things like fog emitters, wind, collisions, etc. I tried with a 64x64x64 grid but the precision is not good enough, so I’ll try with a larger grid size.
https://worthcompare.com/2bftwoh6d For an alternative technique you can have a look at “Volumetric Fog: Unified compute shader based solution to atmospheric scattering”, used in Assassin’s Creed 4 and described by Bart Wronski at SIGGRAPH (slides are available here ). It’s more complicated, but it may be faster (especially for multiple lights) and using an intermediate 3D texture is really interesting as it allow to do more advanced calculations.
https://asperformance.com/uncategorized/ooxvfbuo1k As I said at the beginning it’s just a start, and yet I find it already improves the sensation of depth of the scene. It reinforces the impact of lights as they no longer only impact the geometry. And with a low number of steps the cost it’s fast enough, so it’s really something I want to deepen !
https://giannifava.org/1ouuozk I had no idea you could do this in a shader: “float3 accumFog = 0.0f.xxx;” This saves me so much time! Nice blog by the way, I am really enjoying all of your cool post and this will be helpful once I finally code up shadows.
https://www.worldhumorawards.org/uncategorized/2x9c5tz hi, awesome tutorial!!
I was recently implementing this method in my game engine, but unfortunately I am facing some issues and I was hoping that you could help me.
https://musiciselementary.com/2024/03/07/1ks8rx5f3 my implementation:
1. Render scene in position map (g-buffer)
2. Render a full screen quad (orthographic projection) using ray marching shader
https://www.goedkoopvliegen.nl/uncategorized/julw1rfkuo In the shader:
1. calculate pixels’ world position (from g-buffer)
2. move from world position towards camera position using ray direction
3. calculate scattering and shadow value
https://ncmm.org/eeqe908 but the result is very subtle (I mean very), and if I multiply “accumFog” with some constant its too much. I am using only directional lights for scattering.
great tutorial!!
I was recently working to implement this technique in my own game engine, but I am facing some issues. I am using directional light but the effect is barely visible
my implementation:
1. render the scene in a position map (g-buffer)
2. render a full screen quad using orthographic projections with ray marching shader
in the ray marching shader:
1. get world position for current pixel (from g-buffer position map)
2. get camera position in world space
3. trace a ray from pixel to camera position
if I multiply the “accumFog” by constant the rays saturate the scene
thanks
Great post!
https://fotballsonen.com/2024/03/07/don80kr By the way, there’s a typo in the H-G equation in the original article, so the following function
https://tankinz.com/vtknqxue float ComputeScattering(float lightDotView)
{
float result = 1.0f – G_SCATTERING;
result *= result;
…
}
should instead be
float ComputeScattering(float lightDotView)
{
float result = 1.0f – G_SCATTERING*G_SCATTERING;
…
}
Great tutorial ! It really helped me! Thank you!